>>
30-MINUTE MEALS! Get the email series now →


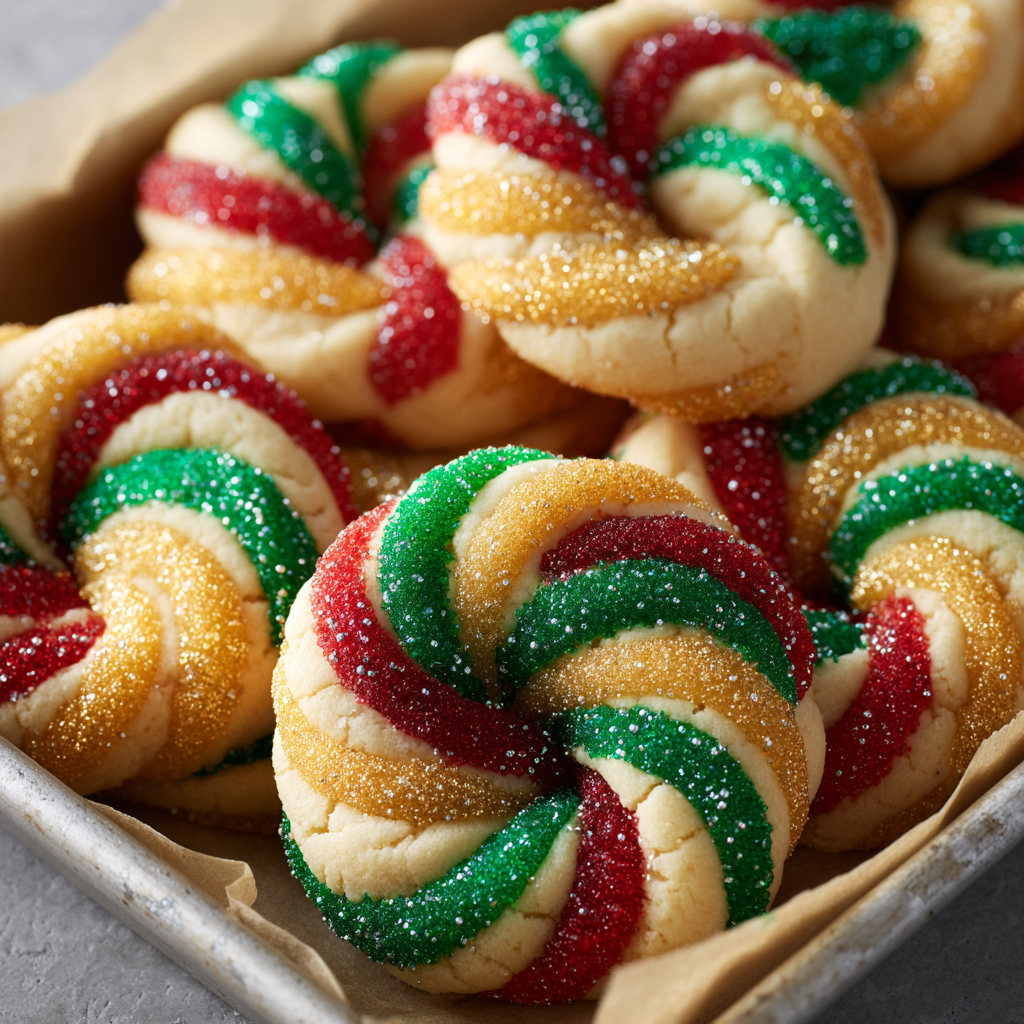
Buttery, tender cutouts shaped for the season and finished with glossy royal-style icing — a festive cookie that’s as fun to decorate as it is to share.

This batch of Twisted Christmas Cookies has been my go-to for holiday gatherings ever since I first experimented with swapping a splash of almond and bright orange zest into a classic cutout dough. I discovered the combination one chilly December evening when I was trying to give plain sugar cookies a more grown-up flavor without losing their buttery, tender texture. The result was a cookie that holds a crisp edge, a soft bite, and a lift of citrus that cuts through the richness — the kind of treat that disappears from the platter before the coffee is finished.
What makes these cookies special isn’t just their flavor but the entire ritual: rolling the dough, outlining with a piping bag, and then watching kids (and adults) argue over who gets the red star or the gold-sprinkled tree. They’re sturdy enough for elaborate decorating yet tender enough to melt on the tongue. I often make multiple sheets, freeze shaped dough for last-minute batches, and bring tins to neighbors because they travel beautifully when boxed with a sheet of parchment between layers.
In my experience, the orange zest was the surprise hit — a spoonful of bright citrus that lifts the heavy butter notes and makes the aroma irresistible as trays come out of the oven. Family members who usually skip decorated cookies come back for seconds when these are around.
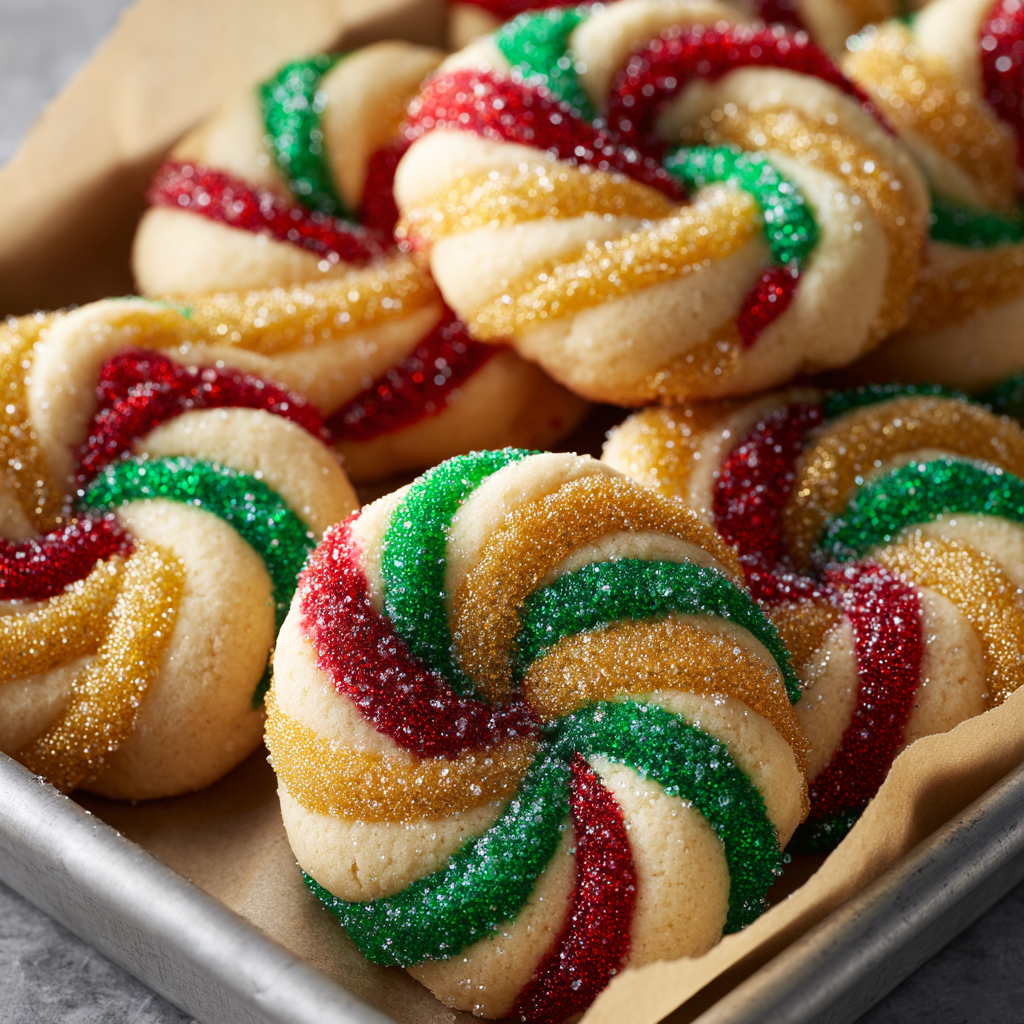
My favorite part is the decorating session: a playlist, a hot cup of tea, and a mountain of sprinkles. I’ve found that letting kids outline in a separate color before flooding keeps the designs tidy, and adults love adding metallic gold accents for a special touch.
Store undecorated cookies in an airtight container at room temperature for up to three days. For longer storage, stack in single layers separated by parchment and freeze for up to three months; thaw at room temperature before decorating. Decorated cookies should be fully dry before stacking — I let them dry overnight on a cooling rack, then layer with parchment. If you need to transport them, pack flat in a shallow tin with dividers or bubble wrap to protect delicate decorations. Reheat is unnecessary — these are best at room temperature.
If you need to adapt ingredients, use the following swaps: unsalted butter can be replaced with salted butter — omit any added salt in recipes. For a dairy-free version, use a quality vegan butter and substitute aquafaba for eggs (3 tablespoons aquafaba per egg) but expect a slightly different texture and less golden edges. If almond extract is a problem, swap with an extra teaspoon of vanilla and a pinch of cardamom for warmth. For gluten-free, use a 1:1 gluten-free flour blend with xanthan gum; chilling and gentle handling become even more important to prevent crumbling.
Serve on a decorative platter with a mix of iced and undecorated cookies for visual interest. Pair with strong coffee, mulled cider, or a lightly sweetened tea. For a festive dessert table, combine with gingerbread and peppermint bark so guests can compare flavors. Garnish platters with fresh rosemary sprigs for a pine-like accent; edible gold dust on cookie centers instantly elevates presentation for parties.
For winter: add a pinch of nutmeg or warm ginger to the dough for extra depth. For a spring-themed twist, omit almond and orange, add lemon zest, and use pastel icing. On Halloween, swap the cutters for pumpkins and ghosts and use black, orange, and purple gels. Adjust the extract and zest combinations to match seasonal flavor profiles while preserving the buttery base and bake times.
Make the dough two days ahead and keep wrapped in the refrigerator. Alternatively, shape cookies on parchment and freeze the unbaked shapes on a tray, then transfer to a bag; you can bake straight from frozen — add 1–2 minutes to baking time. Prepare the icing in advance and store airtight in the refrigerator; bring to room temperature and re-whisk before using. Pack decorated cookies in shallow containers for gifting, and include a drying rack if the icing is still tacky when transporting.
One winter I brought a tin to a neighborhood cookie swap and came home with half a dozen new recipes and a repeat request for my Twisted Christmas Cookies. A friend used my recipe as the base for a cookie cake at a baby shower — she cut larger shapes and piped a message in gold icing. I’ve also taught this as a small class with kids; the tip to do outlining first, then flooding, made their designs tidy and gave them confidence with piping bags.
These cookies are more than a sweet — they’re a holiday ritual: the scent of orange and almond in the kitchen, the laughter around the counter, and the tins traded with neighbors. If you try them, adjust the decorating to your personality and enjoy the process as much as the finished plate.
Always measure flour by spooning into the cup and leveling with a knife — packing flour causes dense cookies.
Chill cut shapes on the baking sheet before baking to preserve crisp edges and prevent spread.
Use gel colors for vivid hues without thinning icing too much; add tiny dots at a time until desired color is reached.
Work with one color at a time and keep unused icing covered with plastic wrap to prevent crusting.
If icing crusts, stir in a few drops of water until it regains a smooth texture; do not over-thin.
This nourishing twisted christmas cookies recipe is sure to be a staple in your kitchen. Enjoy every moist, high protein slice — it is perfect for breakfast or as a wholesome snack any time.
Yes. Unbaked shaped dough can be frozen on a tray for up to 3 months. Thaw in the refrigerator overnight before baking.
Allow fully decorated cookies to dry for several hours up to overnight. Store in an airtight container at room temperature for 4–5 days.
This Twisted Christmas Cookies recipe makes perfectly juicy, tender, and flavorful steak every time! Serve with potatoes and a side salad for an unforgettable dinner in under 30 minutes.
Preheat oven to 350°F (175°C). Line two to three baking sheets with parchment paper for even baking and easy removal.
In a large bowl or stand mixer, cream 1 3/4 cups softened butter with 1 cup sugar until light and fluffy, about 3–4 minutes on medium speed.
Beat in 2 large eggs, then add 2 teaspoons vanilla, 1 teaspoon almond extract, and the zest of 1 orange; mix until smooth.
Gradually add 6 cups all-purpose flour on low speed until dough comes together; add 1 tablespoon milk only if the dough is too crumbly.
Form into discs, wrap, and chill for 10–15 minutes. Roll to 1/4-inch thickness and cut shapes with cookie cutters.
Chill cut shapes 10–15 minutes on the tray, bake 10–12 minutes until edges are just golden, then cool completely on a rack before icing.
Whisk 6 tablespoons meringue powder with 8 tablespoons water and 2 teaspoons lemon juice; gradually beat in 7 cups sifted powdered sugar until glossy; divide and color.
Pipe outlines and flood centers, add sprinkles or crushed candy canes while icing is wet, and allow decorated pieces to set fully for several hours.
Last Step: Please leave a rating and comment letting us know how you liked this recipe! This helps our business to thrive and continue providing free, high-quality recipes for you.
Leave a comment & rating below or tag
@snapyrecipe on social media!
Golden-browned chicken tossed with rotini in a silky garlic Parmesan sauce—comforting, quick, and perfect for weeknight dinners.
A vibrant, smoky Southwest chicken wrap loaded with rice, beans, corn, and a creamy chipotle-lime sauce — perfect for lunch, meal prep, or an easy weeknight.

A timeless apple crumble with a buttery, cinnamon-scented topping and tart-sweet Granny Smith filling — perfect warm with vanilla ice cream.
Leave a comment & rating below or tag @snapyrecipe on social media!
Enjoyed this recipe? Share it with friends and family, and don't forget to leave a review!
This recipe looks amazing! Can't wait to try it.
Comments are stored locally in your browser. Server comments are displayed alongside your local comments.
Quick and easy dinner ideas delivered to your inbox.