
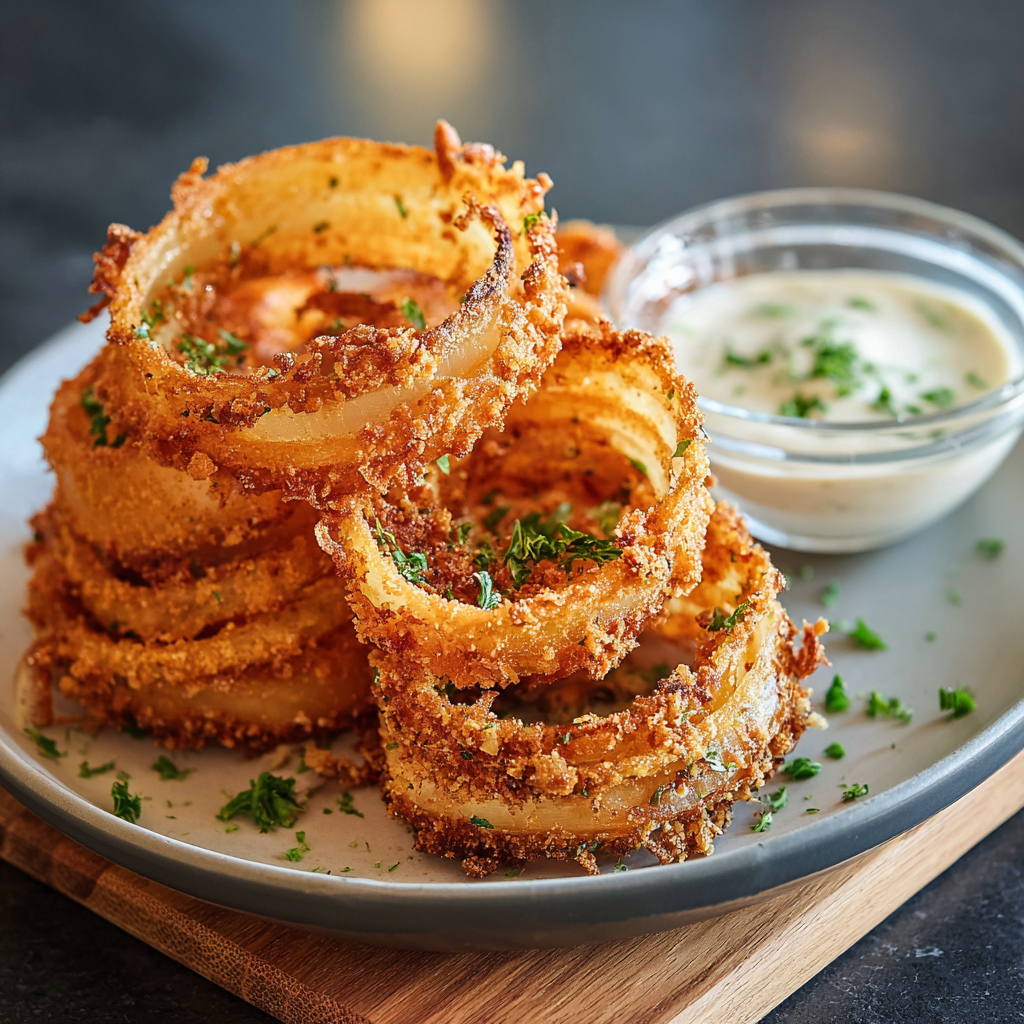
Onion Ring Chips

Crispy, golden onion ring chips with a seasoned flour dredge, buttermilk soak and crunchy panko coating — perfect for snacking or as a side.

Why You'll Love This Recipe
- The method is fast and reliable: ready in about 30 minutes from start to finish, perfect for last-minute entertaining or a movie night snack.
- Uses pantry staples—plain flour, garlic powder, paprika, panko and buttermilk—so you can make them without a special trip to the store.
- The double coating gives an exceptionally crunchy texture that stays crisp if drained on a wire rack rather than paper towels.
- Flexible and forgiving: you can switch panko for crushed cornflakes or gluten-free crumbs if needed and still achieve a satisfying crunch.
- Make-ahead options: you can slice the onions and keep them refrigerated for a few hours, or prepare the dredge and panko ahead to speed assembly.
- Crowd-pleasing and versatile—serve as a party nibble, alongside sandwiches, or with a main course as an elevated side.
In my kitchen this turned into a small ritual: slice, soak, dredge, then fry while sharing stories with whoever hangs around. The first time I tried using panko instead of regular breadcrumbs, the texture change was dramatic and led to this version becoming my default method. My kids especially love to help press the panko onto the rings, and they always claim the right to sample one fresh from the oil.
Ingredients
- 2 large onions, sliced into 1/4-inch rings: Choose sweet or yellow onions for balanced sweetness and structure. Look for firm bulbs without soft spots; the thickness of 1/4 inch keeps the center tender while allowing the coating to crisp. I prefer Vidalia or large yellow storage onions for predictable sweetness.
- 1 cup all-purpose flour: Acts as the initial seasoned dredge. Use a dependable brand like King Arthur or Gold Medal for consistent absorption and texture. Sift if lumpy to ensure even coating.
- Seasonings for dredge: 1 teaspoon garlic powder, 1 teaspoon paprika, 1/2 teaspoon salt, 1/2 teaspoon black pepper. These spices build the backbone of flavor; smoked paprika can be used for a smokier profile.
- 1 cup buttermilk: The acidic soak that tenderizes and helps coatings adhere. If you do not have cultured buttermilk, make a quick substitute by adding 1 tablespoon white vinegar or lemon juice to 1 cup milk and let it sit for 5 minutes.
- 2 cups panko breadcrumbs: Japanese-style panko gives a light, shattering crust. Brands like Kikkoman or Ian’s produce consistent flakes. For extra crunch, toast the panko lightly in a dry skillet before using.
- Vegetable oil for frying: Use a neutral oil with a high smoke point such as canola, sunflower or peanut oil. Heat to 350 degrees F and keep the oil depth about 2 inches for even frying; this recipe uses approximately 4 cups of oil in a medium pot.
Instructions
Slice and dry the onions: Peel two large onions and slice them into 1/4-inch rings. Take care to make even slices using a sharp chef’s knife or a mandoline set to 1/4 inch for uniformity. Separate the rings and pat each lightly with paper towels to remove surface moisture; a drier surface improves adhesion during the dredge stage. Work quickly to avoid excessive juice release. Prepare the seasoned dredge: Whisk together 1 cup all-purpose flour, 1 teaspoon garlic powder, 1 teaspoon paprika, 1/2 teaspoon salt and 1/2 teaspoon black pepper in a shallow bowl. Sifting the flour and spices together ensures an even coating. Keep this bowl within reach of your assembly line so you can move efficiently between steps. Buttermilk soak: Place the onion rings into 1 cup buttermilk and let them sit for 5 minutes. This brief soak loosens the layers slightly and helps the dredge cling to irregular edges. If you prefer extra tang, add a teaspoon of Dijon mustard to the buttermilk. First dredge: Shake off excess buttermilk from each ring, then dredge in the seasoned flour so a thin, even layer forms. Tap off any heavy clumps; an even thin layer prevents the coating from becoming gummy. Arrange floured rings on a wire rack to keep air circulation and prevent steam from softening the coating. Panko coating: Dip each floured ring briefly back into the buttermilk, then press firmly into 2 cups panko breadcrumbs, coating both sides. Use slightly firm pressure to help the panko adhere. For extra coverage, press the panko into the ring on the rack so any loose flakes stick before frying. Heat the oil: Heat vegetable oil to 350 degrees F (175 degrees C) in a heavy skillet or Dutch oven to a depth of about 2 inches. Use a reliable candy or fry thermometer to monitor temperature. Keep the heat consistent; if oil is too hot, the panko will brown before the onion inside cooks. Fry in batches: Fry the rings in a single layer for about 2 to 3 minutes per side until golden and crisp. Work in small batches to avoid overcrowding, which drops the oil temperature and leads to soggy crusts. Use a slotted spoon to transfer the rings to a wire rack set over a sheet pan to drain. Season and serve: While still hot, sprinkle the onion chips with a pinch of fine sea salt. Serve immediately with dipping sauces such as chipotle mayo, ranch, or a tangy ketchup. Leftover chips will lose crispness, so eat fresh for best texture.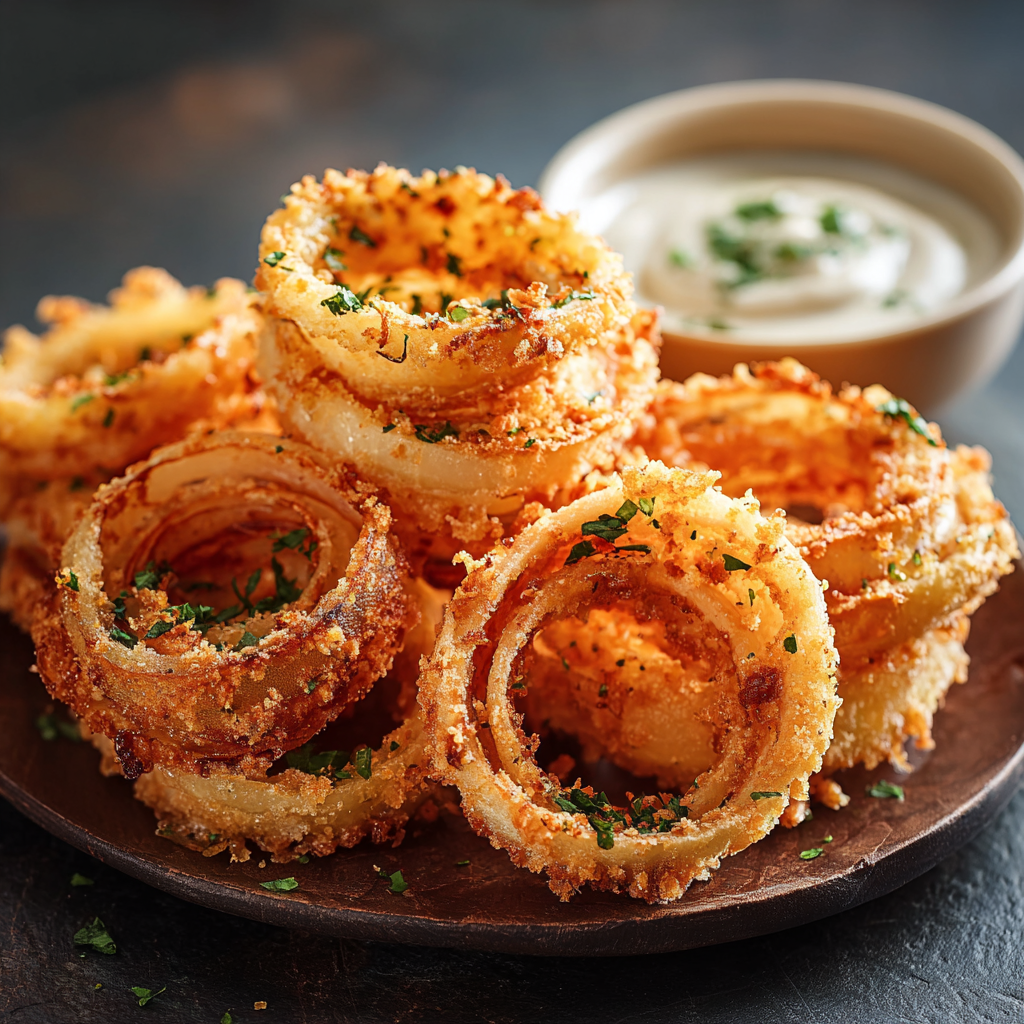
You Must Know
- These chips are best enjoyed immediately; the panko coating will soften if refrigerated and reheated, although a quick re-fry or oven crisp-up helps restore texture.
- Store at room temperature no more than 1 hour; refrigerate in an airtight container up to 2 days for convenience but expect reduced crispness.
- High in carbohydrates from flour and panko and moderate in fat due to frying; serve with a fresh green salad to balance the meal.
- The recipe freezes poorly once fried; instead, freeze the prepared but uncoated rings for up to 1 month, then coat and fry from frozen for slightly longer times.
My favorite thing about this method is how approachable it is: no complicated batters, just layers of flavor and texture delivered reliably. The ritual of pressing panko into each ring is oddly satisfying and a great task for helpers. At a backyard barbecue, these became the first thing on the plate, disappearing while the grill still sizzled. A good thermometer and a wire rack make the difference between an acceptable snack and a phenomenal one.
Storage Tips
To keep quality as high as possible, drain the fried rings well on a wire rack set over a sheet pan so excess oil can drip away; this prevents steam from softening the crust. If you must store leftovers, let them cool completely, then place them in a single layer inside an airtight container with paper towels to absorb moisture. Refrigerate up to 48 hours. To re-crisp, place on a baking sheet in a 375 degrees F oven for 5 to 8 minutes, watching carefully so the panko does not over-brown. Avoid microwaving, which will produce limp results.
Ingredient Substitutions
If you need to adapt, there are many successful swaps. For gluten-free versions, replace all-purpose flour with a gluten-free 1-to-1 flour blend and use gluten-free panko or crushed rice cereal. Swap regular panko for crushed cornflakes for a slightly sweeter crunch. If buttermilk is unavailable, use 1 cup milk with 1 tablespoon lemon juice or vinegar as a quick cultured substitute. For dairy-free adaptations, use plant-based milk thinned with a teaspoon of vinegar for acidity and a dairy-free breadcrumb alternative. These changes will slightly alter texture, so expect modest differences in browning and adhesion.
Serving Suggestions
Serve the onion chips as an appetizer with an assortment of dips: a smoky chipotle mayo, classic ranch, spicy ketchup or a lemony yogurt dip. They complement grilled burgers, fried chicken or a plate of loaded fries. Garnish with chopped chives or smoked salt for a refined finish, and offer wedges of lemon to squeeze over the rings for brightness. For a sharing platter, pair with pickles, coleslaw and a crisp beer or sparkling lemonade.
Seasonal Adaptations
In late summer, use sweet Vidalia onions for a candy-like center; in autumn, closer to storage onions offer more structure and less moisture. For winter entertaining, add warm spices to the dredge like a quarter teaspoon ground cumin or a pinch of cinnamon for a holiday twist. In spring, brighten the batter with fresh herbs folded into the panko, such as thyme or parsley. Adjust frying times slightly for thinner rings or if cooking at altitude to ensure even doneness.
Meal Prep Tips
For batch prep, slice the onions and store them covered in the refrigerator for up to 12 hours to keep them from drying out. Prepare the seasoned flour and panko into labeled bowls and refrigerate; assemble and fry just before serving. If you expect a crowd, pre-dredge and panko-coat the rings, place them on baking sheets single-layered, then flash-freeze for 30 minutes; transfer to a freezer bag. Fry from frozen an extra 30 to 45 seconds per side until golden.
These onion ring chips are an approachable, joyful snack that welcomes improvisation. They are a reminder that a few pantry staples and careful technique can create something that feels special. Make them often, share them freely, and tweak the seasonings until you have your perfect version.
Pro Tips
Pat the onion rings dry before soaking to improve adhesion and reduce splatter.
Fry in small batches and let oil return to 350°F between batches to maintain crispness.
Drain on a wire rack rather than paper towels to keep both sides crisp and avoid steam.
This nourishing onion ring chips recipe is sure to be a staple in your kitchen. Enjoy every moist, high protein slice — it is perfect for breakfast or as a wholesome snack any time.
FAQs about Recipes
How do I keep the oil at the right temperature?
Use a digital or candy thermometer to maintain 350°F; too hot will burn the panko, too cool will make them greasy.
Can I make these without buttermilk?
You can substitute milk with a splash of lemon juice or use plant milk with apple cider vinegar for a dairy-free version, though flavor will be slightly different.
Tags
Onion Ring Chips
This Onion Ring Chips recipe makes perfectly juicy, tender, and flavorful steak every time! Serve with potatoes and a side salad for an unforgettable dinner in under 30 minutes.
Ingredients
Main
Dredge
Soak and Coating
For Frying
Instructions
Slice and dry onions
Peel two large onions and slice into 1/4-inch rings. Separate rings and pat dry with paper towels to remove surface moisture for better adhesion.
Prepare dry dredge
Mix 1 cup flour, 1 teaspoon garlic powder, 1 teaspoon paprika, 1/2 teaspoon salt, and 1/2 teaspoon black pepper in a shallow bowl to create a seasoned flour.
Buttermilk soak
Place rings in 1 cup buttermilk and let sit 5 minutes; this tenderizes and helps the coating stick.
First dredge
Shake off excess buttermilk and dredge each ring in the seasoned flour, ensuring an even thin layer before setting on a rack.
Panko coating
Dip the floured rings back into buttermilk and press into 2 cups panko breadcrumbs so they are well-coated on both sides.
Heat oil
Heat vegetable oil to 350°F (175°C) in a heavy skillet or pot to a depth of about 2 inches. Use a thermometer for accuracy.
Fry in batches
Fry the rings in a single layer for 2 to 3 minutes per side until golden and crisp. Avoid overcrowding and drain on a wire rack.
Season and serve
Sprinkle with a pinch of salt while hot and serve immediately with your choice of dips.
Last Step: Please leave a rating and comment letting us know how you liked this recipe! This helps our business to thrive and continue providing free, high-quality recipes for you.
Nutrition
Did You Make This?
Leave a comment & rating below or tag
@snapyrecipe on social media!
Categories:
You might also like...
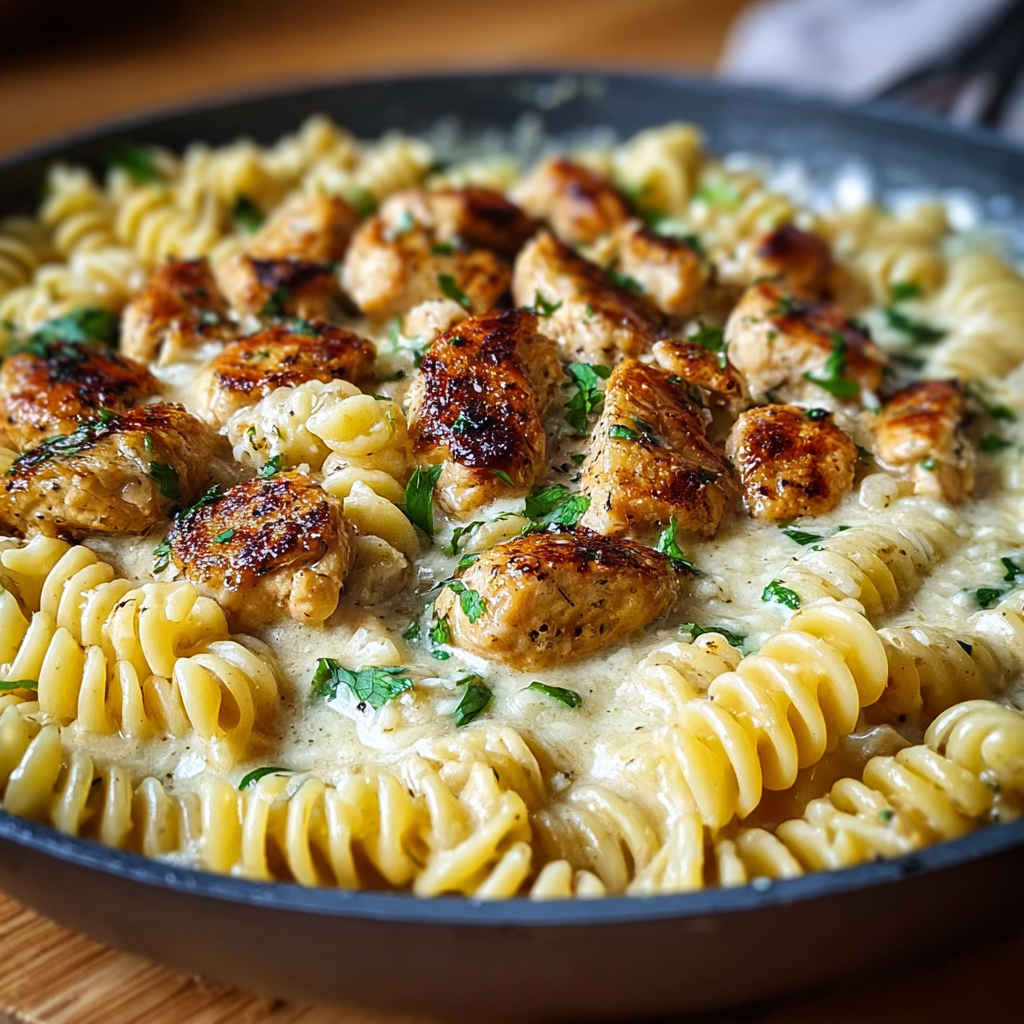
Creamy Garlic Butter Chicken & Rotini in Parmesan Sauce
Golden-browned chicken tossed with rotini in a silky garlic Parmesan sauce—comforting, quick, and perfect for weeknight dinners.
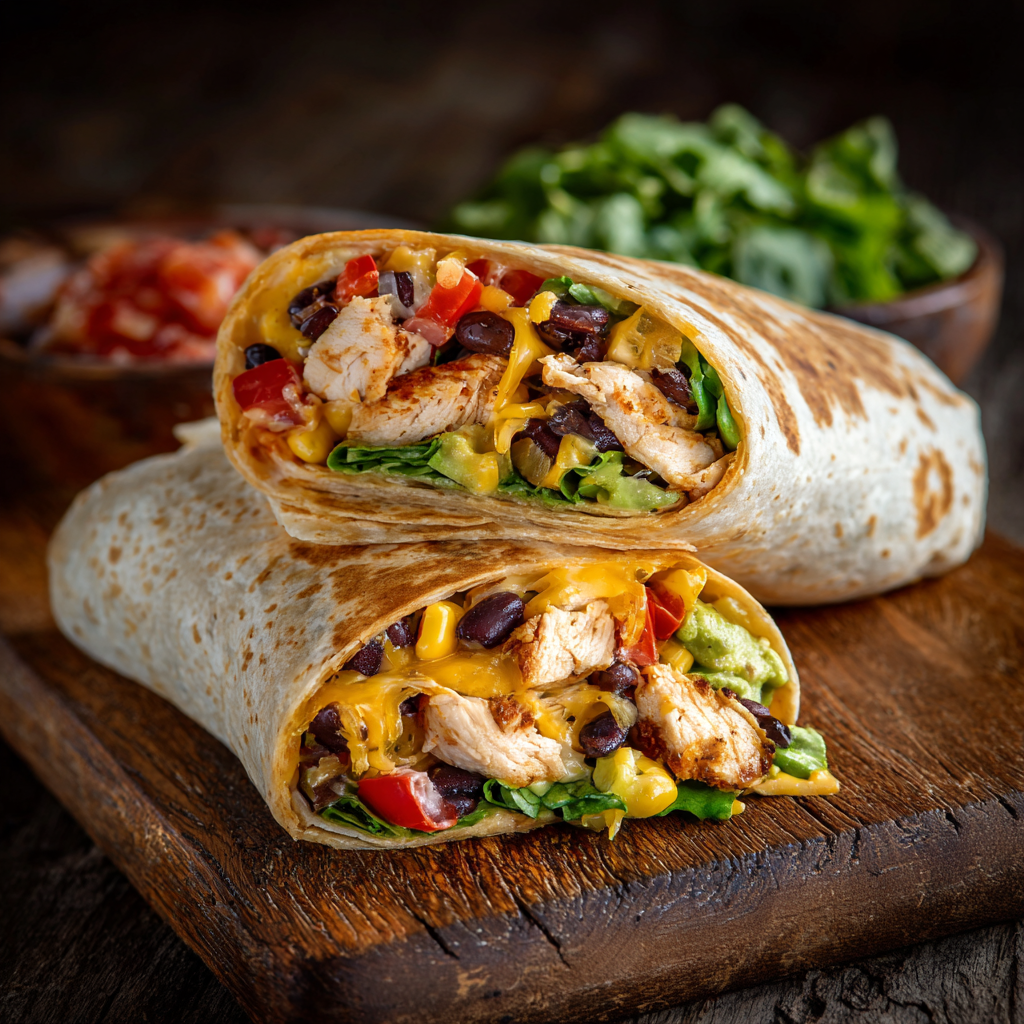
Southwest Chicken Wrap
A vibrant, smoky Southwest chicken wrap loaded with rice, beans, corn, and a creamy chipotle-lime sauce — perfect for lunch, meal prep, or an easy weeknight.

Classic Apple Crumble
A timeless apple crumble with a buttery, cinnamon-scented topping and tart-sweet Granny Smith filling — perfect warm with vanilla ice cream.
Did You Make This?
Leave a comment & rating below or tag @snapyrecipe on social media!
Rate This Recipe
Share This Recipe
Enjoyed this recipe? Share it with friends and family, and don't forget to leave a review!
Comments (1)
This recipe looks amazing! Can't wait to try it.
Comments are stored locally in your browser. Server comments are displayed alongside your local comments.
Hi, I'm Natalia!
What's Popular

Get My 30-Minute Meals email series!
Quick and easy dinner ideas delivered to your inbox.