
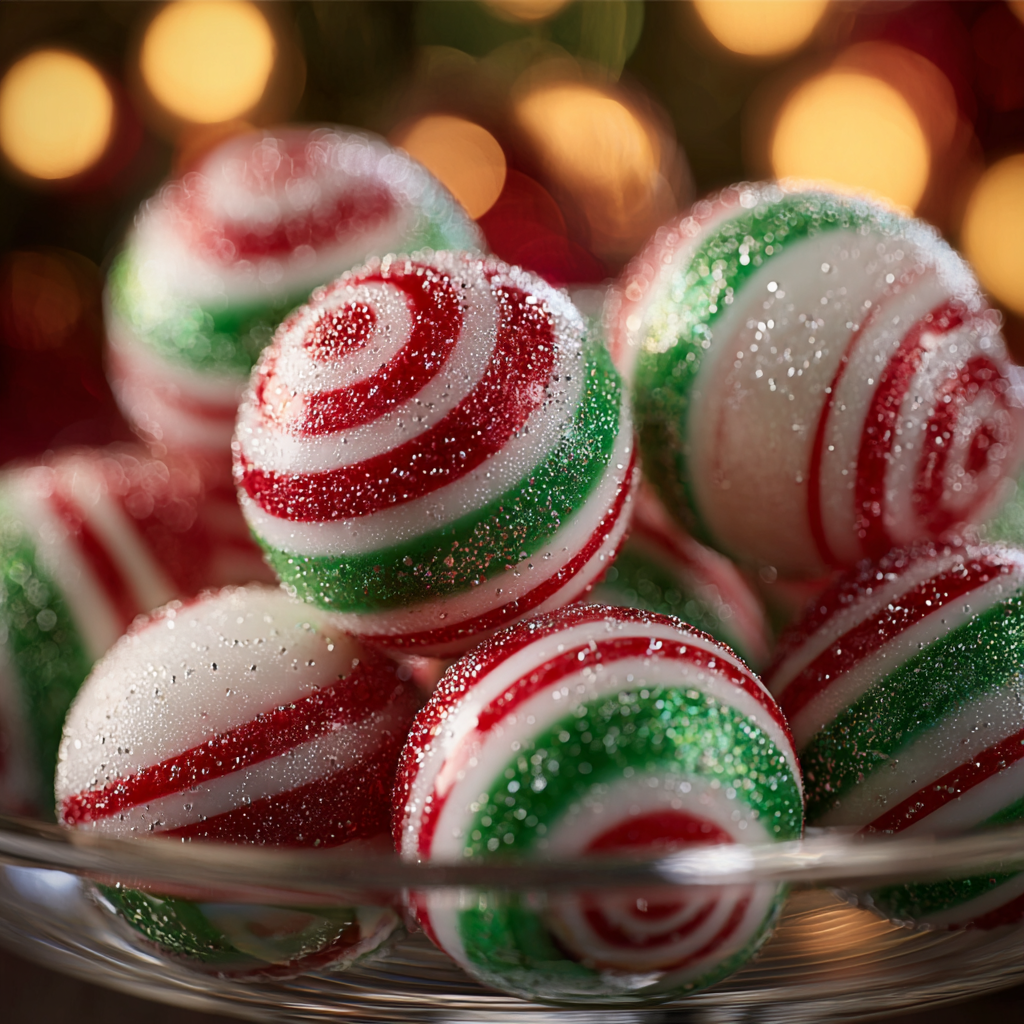
Delicious No-Bake Soft Peppermint Balls Recipe

Soft, festive peppermint balls that require no baking—perfect for holiday gifting, quick dessert trays, or a colorful treat that sets up in minutes.

This recipe began as a last-minute attempt to bring something bright and cheerful to a neighborhood cookie swap, and it instantly became a holiday staple. I first discovered the combination of silky confectioners sugar, a touch of butter, and peppermint extract when I wanted a softer, melt-in-your-mouth alternative to hard candy canes. The result is a tender, ribboned sweet that is lightly firm after chilling yet gives way on the tongue in a way that feels indulgent without being heavy. I remember my neighbor taking one bite, closing her eyes, and declaring them “perfect,” which turned them into a requested gift every December from then on.
What makes these treats special is the texture and the immediate seasonal association that peppermint delivers. They are not crunchy like traditional mints; instead they are soft, slightly creamy from the butter or vegan butter option, and intensely minty in a clean, refreshing way. The dough is forgiving, easy to work with, and perfect for anyone who wants a quick confection that still looks handmade and beautiful on a platter. I discovered a few technique tweaks along the way—sifting the powdered sugar, folding in the extract slowly, and chilling the shaped treats to firm them—each one makes a meaningful difference to the finished product.
Why You'll Love This Recipe
- Ready in under an hour from start to finish, including chill time, making it perfect for last-minute gifting or an afternoon of holiday baking with kids.
- Uses pantry-friendly ingredients: confectioners sugar, a little butter, and peppermint extract are inexpensive and easy to find year-round.
- No oven required—ideal for hot kitchens, dorm cooking, or anyone without a full oven setup.
- Customizable for dietary needs: swap vegan butter and almond or oat milk to make a dairy-free version with almost identical texture and flavor.
- Beautiful, colorful finish when using red and green gel colors, and it stores well for several weeks in the refrigerator for advance preparation.
- Great for making ahead and portioning for party trays, cookie exchanges, or gift boxes because they keep their shape and color after chilling.
In my experience, family members love the contrast between the bright peppermint flavor and the soft, almost fudge-like bite. When I bring a tray to holiday gatherings, the colorful striped look always disappears first. The combination of ease, visual appeal, and that unmistakable mint note makes these a repeat favorite in our home.
Ingredients
- Powdered sugar (2 cups): Use sifted confectioners sugar for the smoothest texture. I prefer brands that are finely milled; sifting removes lumps and ensures a silky dough that is easier to shape.
- Light corn syrup (1 tablespoon): Adds a bit of chew and shine to the dough. If you prefer natural alternatives, honey or maple syrup can be used, though they will add a slight flavor change and may alter the set slightly.
- Unsalted butter (2 tablespoons), softened: For the creamiest mouthfeel use high-quality butter. Vegan butter gives a nearly identical result for a dairy-free option; bring it to room temperature so it folds in smoothly.
- Peppermint extract (1/2 teaspoon): Essential for the classic mint profile. Use pure peppermint extract rather than mint oil for balanced flavor—start with less and increase if you want more intensity.
- Milk (1 tablespoon): Whole milk adds richness; almond or oat milk are excellent non-dairy choices. Add a touch more only if the dough feels too stiff.
- Red and green gel food coloring: Gel colors provide vivid hues without thinning the dough. Use sparingly—a little goes a long way.
- Optional edible glitter or luster dust: For a festive shimmer. Lightly dust after chilling so the finish remains delicate and pretty.
Instructions
Combine dry and wet: In a medium mixing bowl, add 2 cups sifted confectioners sugar. Add 1 tablespoon light corn syrup, 2 tablespoons softened unsalted butter, 1/2 teaspoon peppermint extract, and 1 tablespoon milk. Use a rubber spatula to fold until a shaggy mass forms, then press and mix until a smooth, pliable dough develops. If the mixture seems too sticky, add powdered sugar 1 tablespoon at a time. You want a soft cookie-dough-like consistency that is not tacky to the touch. Adjust texture and rest: Once combined, turn the dough out onto a surface lightly dusted with powdered sugar. Knead gently for 30 to 60 seconds to make sure there are no dry pockets or streaks of butter. If the dough is too dry and crumbly, add a teaspoon of milk and knead again. Resting the dough for 5 minutes helps the powdered sugar hydrate and yields a smoother finish when rolling. Divide and color: Divide the dough into three equal portions. Leave one piece plain. Add a few drops of red gel coloring to the second portion and a few drops of green to the third. Knead each portion until the color is completely uniform. Use gloves if you want to avoid staining fingers. For vivid shades, start with a small amount of gel and build up—the color deepens slightly after chilling. Shape into ropes and twist: On a powdered-sugar-dusted work surface, roll each portion into 1/2-inch-thick ropes. Line them up and gently twist the three ropes together for a classic striped look. If you prefer marbled candy, stack the ropes and roll them together slightly to create soft swirls rather than distinct stripes. Use a light touch to avoid overworking the dough, which can warm it and make it sticky. Cut, chill, and finish: Cut the ropes into 1-inch pieces and shape each into a smooth ball between your palms. Place the balls on a parchment-lined sheet. For a subtle shine or shimmer, dust lightly with edible glitter or luster dust. Transfer the tray to the refrigerator and chill for about 30 minutes to firm up. Chilling ensures the balls hold their shape when handled and gives a clean snap to the outer surface.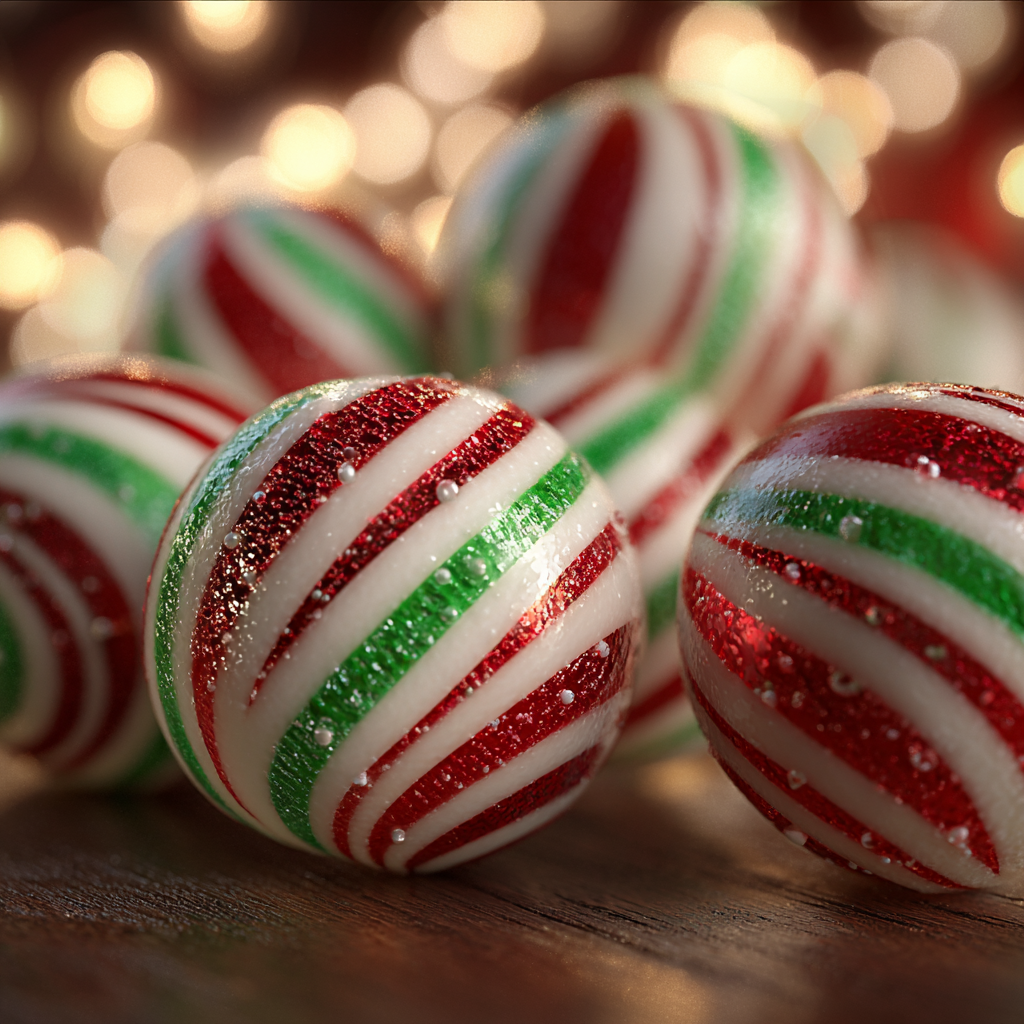
You Must Know
- The treats are high in sugar and should be stored in the refrigerator to keep texture and color stable; they will last up to 3 weeks chilled.
- They are naturally gluten-free, but check labels on food coloring and confectioners sugar if you need strict gluten-free certification.
- Dairy-free versions work very well; swap vegan butter and plant-based milk for a nearly identical result.
- These set faster if chilled right away after shaping—avoid leaving them at room temperature for extended periods, especially in warm kitchens.
- Edible glitter is decorative but optional; it should be added after chilling to maintain sparkle.
My favorite part of making these is how quickly they come together and how universally loved they are. At holiday gatherings they vanish first, and when I make a double batch to share, I often receive messages the next day saying they were a hit. The method is forgiving, so even first-time candy makers can get a beautiful end result with minimal fuss.
Storage Tips
Store the peppermint balls in an airtight container lined with parchment paper in the refrigerator. Layer them with parchment to prevent sticking and condensation. Properly chilled and stored, they keep for up to three weeks; if you plan to keep them longer, freeze in a single layer on a tray until solid, then transfer to a freezer-safe container for up to three months. Thaw in the refrigerator overnight before serving so condensation does not form on the surface. When transporting as a gift, keep them in a cool bag or insulated box to avoid softening.
Ingredient Substitutions
If you need to avoid corn syrup, use light honey or mild-flavored maple syrup—expect a slightly different flavor profile and a touch less sheen. Replace butter with equal parts vegan butter to make the batch dairy-free; use almond or oat milk instead of dairy milk. You can swap peppermint extract for spearmint if you prefer a milder mint character, or use a blend of vanilla and peppermint extract for a softer background note. Be cautious with oil-based extracts; they can change the consistency, so reduce other liquids slightly if using potent mint oil.
Serving Suggestions
Present them in mini candy cups on a holiday platter, or pack a dozen in small cellophane bags tied with ribbon for gifts. They pair beautifully with strong coffee or rich hot chocolate—use the peppermint to cut through the richness of chocolate-based drinks. For a dessert board, include dark chocolate squares, shortbread, and candied nuts to complement the mint. Garnish with small sprigs of fresh mint for color contrast, though avoid placing fresh herbs directly on the candy to prevent moisture transfer.
Cultural Background
Mint confections have long been associated with winter celebrations and hospitality in many Western cultures. The bright peppermint flavor is often used to signal freshness after a meal and has been incorporated into both elaborate candy-making traditions and humble homemade treats. This soft, no-bake variation is a modern adaptation that takes inspiration from classic fondant-style mints and cookie dough–like confections, marrying the convenience of simple ingredients with the visual appeal of hand-crafted candy.
Seasonal Adaptations
For winter holidays keep the red and green theme; for Valentine’s Day use red and pink. In summer, swap peppermint for lemon or orange extract and use pastel colors for a lighter flavor profile. For an elegant winter party, coat half of each ball in melted white chocolate and sprinkle with crushed candy cane pieces for texture. Adjust chilling times as needed when ambient temperatures are higher to ensure they firm up properly.
Meal Prep Tips
Make a double batch and portion into gift boxes or small jars for easy grab-and-go treats. Shape the dough into longer ropes and wrap in plastic wrap to refrigerate; cut and shape into balls just before serving for the freshest look. Use portion scoops to maintain uniform size and bake-age look on platters. Label containers with date and ingredients if gifting to friends or coworkers with allergies.
These peppermint balls are a small, joyful labor that adds color and cheer to any gathering. Their ease, flavor, and adaptability make them a recipe I return to every season, and I hope you find them as satisfying to make and share as I do.
Pro Tips
Sift confectioners sugar before measuring to avoid lumps and ensure a silky texture.
Use gel food coloring for vibrant color without altering dough consistency.
Chill the shaped candies for at least 30 minutes to set and firm up for handling.
Work with small portions and keep hands dry to prevent sticking when rolling.
If using edible glitter, dust after chilling to maintain the sparkle.
This nourishing delicious no-bake soft peppermint balls recipe recipe is sure to be a staple in your kitchen. Enjoy every moist, high protein slice — it is perfect for breakfast or as a wholesome snack any time.
FAQs about Recipes
Can I make these dairy-free?
Yes. Use vegan butter and a non-dairy milk such as almond or oat milk to make them dairy-free.
How long do they keep?
Store chilled in an airtight container for up to 3 weeks, or freeze for up to 3 months.
What if my dough is too sticky or too dry?
If the dough is sticky, add confectioners sugar 1 tablespoon at a time. If crumbly, add 1 teaspoon milk and knead.
Tags
Delicious No-Bake Soft Peppermint Balls Recipe
This Delicious No-Bake Soft Peppermint Balls Recipe recipe makes perfectly juicy, tender, and flavorful steak every time! Serve with potatoes and a side salad for an unforgettable dinner in under 30 minutes.
Ingredients
Main
Instructions
Combine dry and wet ingredients
In a medium bowl, add 2 cups sifted powdered sugar, 1 tablespoon light corn syrup, 2 tablespoons softened butter, 1/2 teaspoon peppermint extract, and 1 tablespoon milk. Fold with a rubber spatula until a smooth, pliable dough forms. Add powdered sugar by the tablespoon if sticky.
Adjust texture and rest
Turn dough onto a surface dusted with powdered sugar and knead gently for 30 to 60 seconds. If crumbly, add 1 teaspoon milk and knead. Rest 5 minutes to hydrate the sugar for a smoother finish.
Divide and color
Split dough into three equal parts. Leave one plain, color the second with red gel, and the third with green. Knead each until uniform color is achieved. Use gloves to avoid staining hands.
Shape ropes and twist
Roll each portion into 1/2-inch ropes on a powdered-sugar-dusted surface. Twist the three ropes together gently for stripes, or roll together for a marbled effect. Cut into 1-inch segments and shape into balls between your palms.
Chill and finish
Place balls on parchment paper and optionally dust with edible glitter. Refrigerate for 30 minutes to firm. Store chilled in an airtight container for up to 3 weeks or freeze for longer storage.
Last Step: Please leave a rating and comment letting us know how you liked this recipe! This helps our business to thrive and continue providing free, high-quality recipes for you.
Nutrition
Did You Make This?
Leave a comment & rating below or tag
@snapyrecipe on social media!
Categories:
You might also like...
Creamy Garlic Butter Chicken & Rotini in Parmesan Sauce
Golden-browned chicken tossed with rotini in a silky garlic Parmesan sauce—comforting, quick, and perfect for weeknight dinners.
Southwest Chicken Wrap
A vibrant, smoky Southwest chicken wrap loaded with rice, beans, corn, and a creamy chipotle-lime sauce — perfect for lunch, meal prep, or an easy weeknight.

Classic Apple Crumble
A timeless apple crumble with a buttery, cinnamon-scented topping and tart-sweet Granny Smith filling — perfect warm with vanilla ice cream.
Did You Make This?
Leave a comment & rating below or tag @snapyrecipe on social media!
Rate This Recipe
Share This Recipe
Enjoyed this recipe? Share it with friends and family, and don't forget to leave a review!
Comments (1)
This recipe looks amazing! Can't wait to try it.
Comments are stored locally in your browser. Server comments are displayed alongside your local comments.
Hi, I'm Natalia!
What's Popular
Get My 30-Minute Meals email series!
Quick and easy dinner ideas delivered to your inbox.