
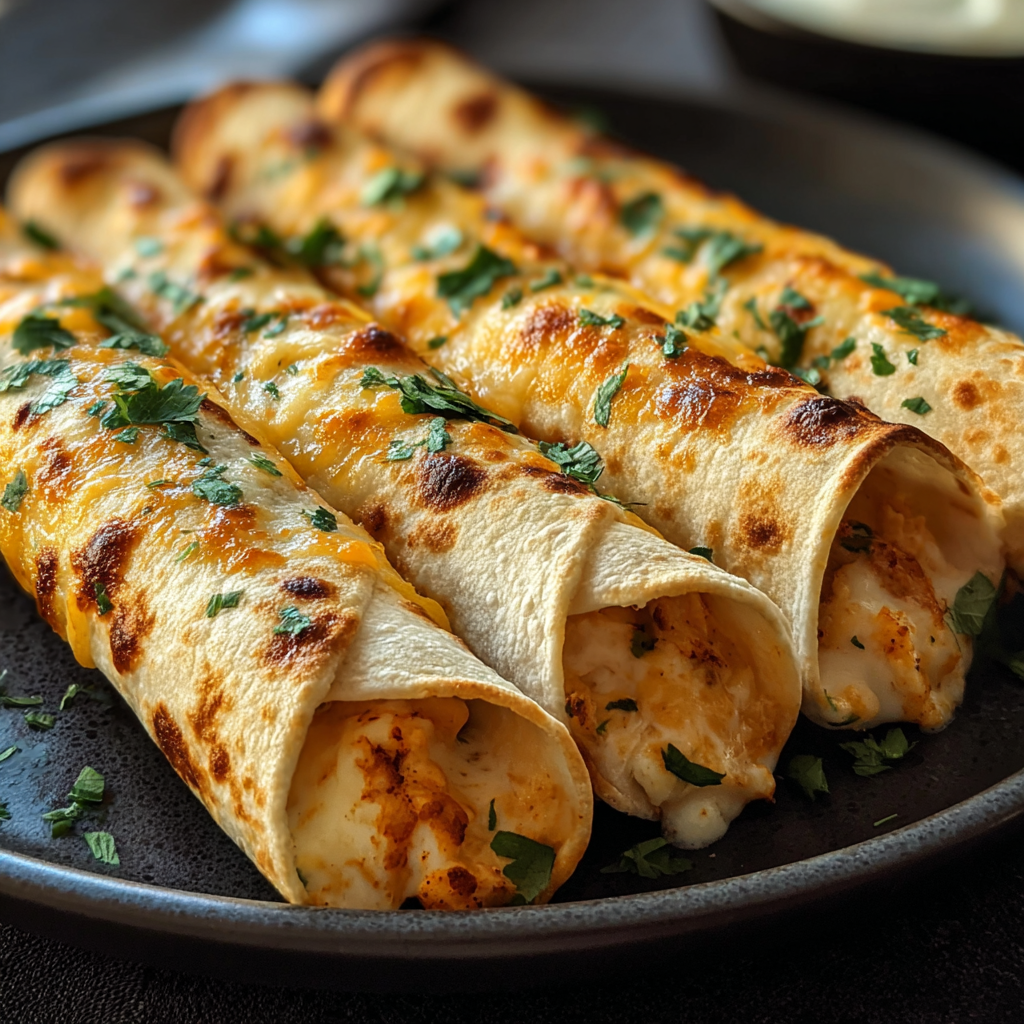
Crispy Chicken Taquitos

Golden, crunchy taquitos filled with creamy, spiced shredded chicken — an easy weeknight winner that reheats beautifully and pleases every crowd.

Why You'll Love This Recipe
- Ready in about 30–35 minutes from start to finish, making it perfect for busy weeknights and last-minute guests.
- Uses rotisserie or leftover shredded chicken, meaning you can turn a simple supermarket staple into something special with minimal effort.
- The filling is creamy yet not greasy — softened cream cheese and shredded cheddar bind the mixture so the taquitos hold their shape when baked.
- Oven-baked for a golden, crunchy exterior without the mess of frying; finish under the broiler for extra crispness in 1–2 minutes.
- Highly adaptable: swap cheeses, spice levels, or tortillas to suit family preferences or dietary needs.
- Excellent for make-ahead and meal prep — freezes and reheats well, and is a crowd-pleaser for parties and potlucks.
I’ve served these to picky teenagers, retired neighbors, and my in-laws, and the reaction is the same: they disappear quickly. One time I brought a pan to a block party and was asked for the recipe three times before the plates were empty. Small tricks — warming the tortillas and brushing with oil — make a big difference, and I always keep a jar of my favorite salsa on hand (I like a medium-chunk tomato salsa for texture).
Ingredients
- Cooked shredded chicken (2 cups): Rotisserie chicken works beautifully here — it’s juicy and already seasoned. Aim for white and dark meat mix for flavor. If shredding yourself, remove excess skin and shred with two forks.
- Cream cheese (4 oz), softened: Bring to room temperature so it blends smoothly. Full-fat gives the best texture and binding power; low-fat will be leaner but slightly less creamy.
- Shredded cheddar or Mexican blend (1/2 cup): Use a freshly shredded cheese for better melting and texture; pre-shredded can contain anti-caking agents that limit melt.
- Salsa (1/4 cup): Choose mild or spicy depending on your heat preference; a thicker, chunkier salsa adds brightness and moisture.
- Garlic powder (1/2 tsp), chili powder (1/2 tsp), cumin (1/2 tsp): These dried spices provide the savory backbone — measure them carefully and taste the filling before rolling to adjust heat.
- Salt and black pepper, to taste: Start with a 1/4 tsp salt and a few grinds of pepper, then adjust — cheeses and store-bought salsa add salt, so err on the side of caution.
- Small flour or corn tortillas (8): Use 6-inch tortillas for perfect-sized taquitos. Flour gives a softer chew; corn makes a heartier, slightly drier crunch and may be gluten-free if labeled so.
- Cooking spray or oil (for brushing): A light brush of oil encourages even browning. Use neutral oil like vegetable or avocado; an oil spray keeps application even.
- Optional toppings: Chopped cilantro, sour cream, guacamole, extra shredded cheese — each adds freshness, cooling creaminess, or extra indulgence.
Instructions
Preheat and prepare: Preheat the oven to 425°F (220°C). Line a baking sheet with parchment paper or lightly grease it to prevent sticking. A hot oven is key so the tortillas crisp quickly — avoid using a cold sheet straight from the fridge, which can slow browning. Make the filling: In a large bowl, combine 2 cups cooked shredded chicken, 4 oz softened cream cheese, 1/2 cup shredded cheddar or Mexican blend, 1/4 cup salsa, 1/2 tsp garlic powder, 1/2 tsp chili powder, 1/2 tsp cumin, and salt and black pepper to taste. Mix vigorously until the cream cheese is fully incorporated; use a fork or a sturdy spatula. If the filling seems dry, add a tablespoon more salsa. Taste for seasoning — the filling should be flavorful since the tortillas are mild. Warm the tortillas: Warm tortillas for about 15–20 seconds in the microwave, covered with a damp paper towel, or heat briefly in a dry skillet. Warming prevents cracking and makes rolling easier. If using corn tortillas, warm each one slightly longer to increase pliability. Assemble taquitos: Spoon 2–3 tablespoons of filling onto one side of each warmed tortilla, leaving room at the edges. Roll each tortilla tightly around the filling and place seam-side down on the prepared baking sheet so they don’t unroll while baking. Press edges gently to seal. Oil and bake: Lightly brush each taquito with oil or spray with cooking spray — this promotes even browning and crispness. Bake in the preheated oven for 15–20 minutes until the shells are golden brown and edges are crisp. For extra crunch, switch to broil for 1–2 minutes at the end, watching closely to avoid burning. Serve: Serve warm with chopped cilantro, sour cream, guacamole, or extra shredded cheese. A squeeze of fresh lime brightens the whole plate. These are easiest to serve on a large platter so guests can pick their preferred toppings.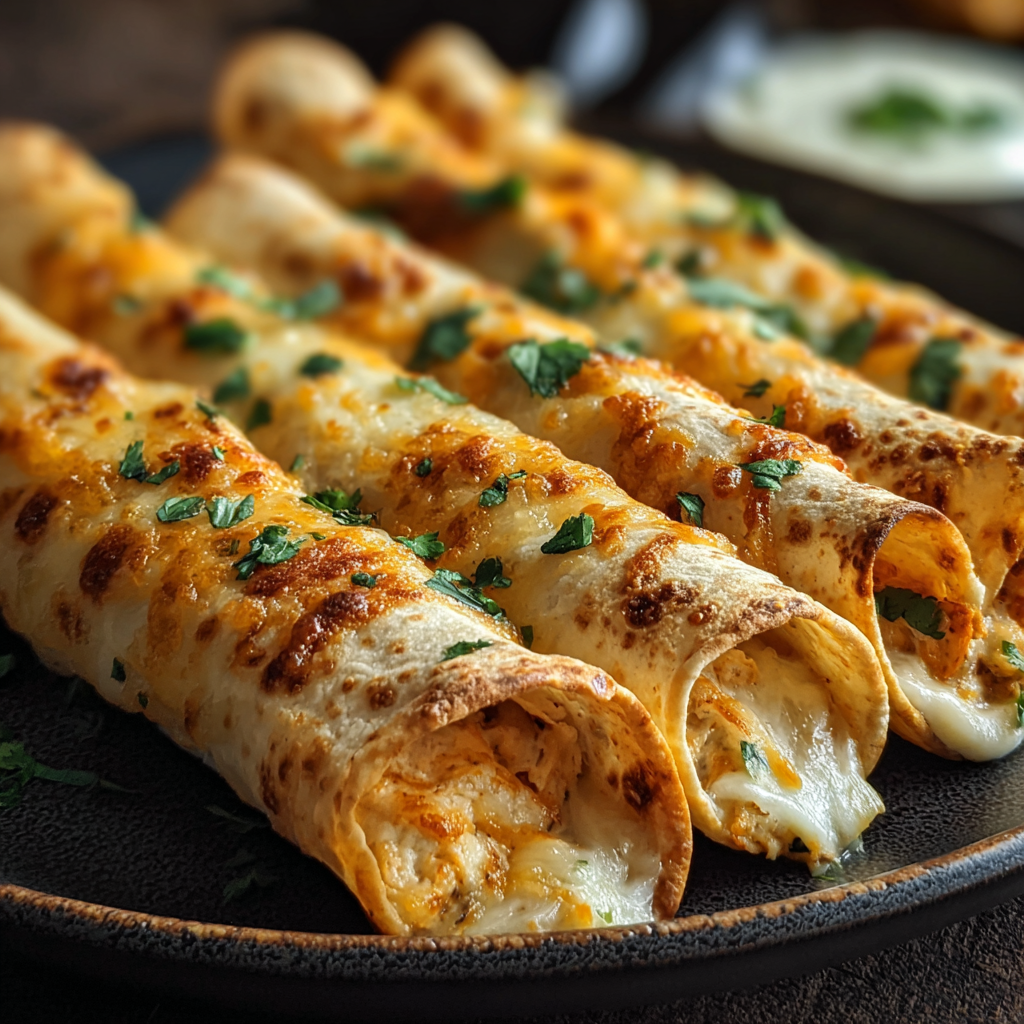
You Must Know
- These hold up well in the refrigerator for 3–4 days when stored in an airtight container; reheat in a hot oven or toaster oven to restore crunch.
- They freeze well for up to 3 months. Freeze on a single layer first, then transfer to a freezer-safe bag. Reheat from frozen at 400°F (205°C) for 12–16 minutes.
- High in protein thanks to shredded chicken; add extra veggies like sautéed peppers for more fiber and color.
- If you need gluten-free, use certified gluten-free corn tortillas and confirm your salsa has no gluten-containing additives.
My favorite part is the contrast of textures: the crisp shell and the creamy, spiced interior. The first time I baked a tray and left them unattended for a minute too long under the broiler, they transformed from gold to char in seconds — it taught me the value of patience and a watchful eye. Now I always set a timer for broiling and stand nearby with the oven door slightly ajar.
Storage Tips
Store cooled taquitos in an airtight container for up to 3–4 days in the refrigerator. Layer them with parchment paper to prevent sticking. Reheat in a preheated oven at 375°F (190°C) for 8–10 minutes, turning halfway, or use a toaster oven for individual portions. To freeze, place cooked and cooled taquitos on a sheet pan in a single layer and flash-freeze for 1 hour, then transfer to a freezer bag or container; they’ll keep for up to 3 months. Reheat from frozen at 400°F (205°C) for 12–16 minutes, or until piping hot inside and crisp outside.
Ingredient Substitutions
Switch the cream cheese for 1/2 cup ricotta or blended cottage cheese if you prefer a lighter texture — the result will be slightly less rich but still cohesive. Swap cheddar for Monterey Jack or pepper jack for more heat. Use corn tortillas for a more authentic flavor and crisper texture; warm them longer to prevent cracking. For a dairy-free version, use dairy-free cream cheese and shredded plant-based cheese, but expect a slightly different melt and flavor. To boost vegetables, fold in 1/2 cup finely diced sautéed bell peppers or spinach — cook them down first to remove excess moisture.
Serving Suggestions
Serve on a large platter with small bowls of sour cream, guacamole, pico de gallo, and lime wedges. A crisp cabbage slaw with lime and cilantro adds a refreshing crunch alongside. For a complete meal, pair with Mexican-style rice and black beans or a leafy green salad with avocado. Garnish the taquitos with chopped cilantro and a drizzle of crema or hot sauce for color and contrast. They also make a fun appetizer — halve them and present on skewers or a platter for parties.
Cultural Background
Taquitos, also known as rolled tacos or flautas depending on the region and tortilla type, have roots in Mexican street food traditions where small, portable fried tortillas filled with meat were popular. In the United States, baked versions rose to prominence as a convenient, family-friendly adaptation. The simplicity of the rolled tortilla makes taquitos a versatile canvas for regional flavors — from norteno beef fillings to chicken with green salsa found in other parts of Mexico. This baked iteration leans into American home-cooking practicality while honoring the handheld essence of the original street fare.
Seasonal Adaptations
Spring: Add fresh cilantro, diced tomatoes, and a squeeze of lime for brightness. Summer: Fold in charred corn and roasted poblano for smoky sweetness. Fall: Mix in shredded roasted butternut squash and swap cheddar for smoked gouda to echo autumn flavors. Winter: Use shredded slow-cooked chicken with warming spices like a touch of smoked paprika and serve with a warm, creamy chipotle dipping sauce. These seasonal tweaks keep the basic method but let local produce shine.
Meal Prep Tips
Make the filling up to 3 days ahead and store in the refrigerator. Warm tortillas just before rolling to avoid stiffness. Assemble taquitos and arrange on a baking sheet, then cover and refrigerate for up to 24 hours before baking; they’ll bake a minute or two longer if cold. For freezer meal prep, assemble and flash-freeze on a sheet pan, then bag them for long-term storage. Reheat directly from frozen in a hot oven at 400°F (205°C) for the best crispness.
These taquitos are simple to make, endlessly adaptable, and reliably crowd-pleasing. Whether you’re feeding a family, prepping lunches for the week, or bringing a shareable appetizer to a party, they deliver comfort, crunch, and flavor — and they’re easy to make your own. Give them a try, and don’t be surprised if they become a staple in your rotation.
Pro Tips
Warm tortillas briefly before rolling to prevent cracking and ensure a tight roll.
Lightly brush with oil rather than spraying heavily; even coverage yields the best browning.
If the filling seems loose, add an extra tablespoon of shredded cheese or a teaspoon of cream cheese to bind it.
This nourishing crispy chicken taquitos recipe is sure to be a staple in your kitchen. Enjoy every moist, high protein slice — it is perfect for breakfast or as a wholesome snack any time.
FAQs about Recipes
How do I make the taquitos extra crispy?
If you want extra crispiness, broil for 1–2 minutes at the end while watching closely so they don't burn.
Can I freeze assembled taquitos?
Yes — make the filling and assemble the taquitos, then freeze on a sheet pan before transferring to a bag. Reheat from frozen at 400°F for 12–16 minutes.
Tags
Crispy Chicken Taquitos
This Crispy Chicken Taquitos recipe makes perfectly juicy, tender, and flavorful steak every time! Serve with potatoes and a side salad for an unforgettable dinner in under 30 minutes.
Ingredients
Filling
Assembly
Optional Toppings
Instructions
Preheat and prepare
Preheat oven to 425°F (220°C). Line a baking sheet with parchment paper or lightly grease it to prevent sticking and encourage even browning.
Combine the filling
In a large bowl, mix 2 cups shredded chicken, 4 oz softened cream cheese, 1/2 cup shredded cheese, 1/4 cup salsa, and the spices. Taste and adjust salt and salsa for moisture.
Warm the tortillas
Warm tortillas for 15–20 seconds in the microwave under a damp paper towel or briefly on a dry skillet to make them pliable and prevent cracking while rolling.
Assemble
Place 2–3 tablespoons of filling on one side of each tortilla and roll tightly. Arrange seam-side down on the prepared sheet to stay closed while baking.
Brush and bake
Lightly brush or spray taquitos with oil and bake at 425°F (220°C) for 15–20 minutes until golden brown. Optionally broil for 1–2 minutes for extra crispness, watching closely.
Serve
Serve warm with cilantro, sour cream, guacamole, or extra cheese. Squeeze lime over the top for brightness.
Last Step: Please leave a rating and comment letting us know how you liked this recipe! This helps our business to thrive and continue providing free, high-quality recipes for you.
Nutrition
Did You Make This?
Leave a comment & rating below or tag
@snapyrecipe on social media!
Categories:
You might also like...
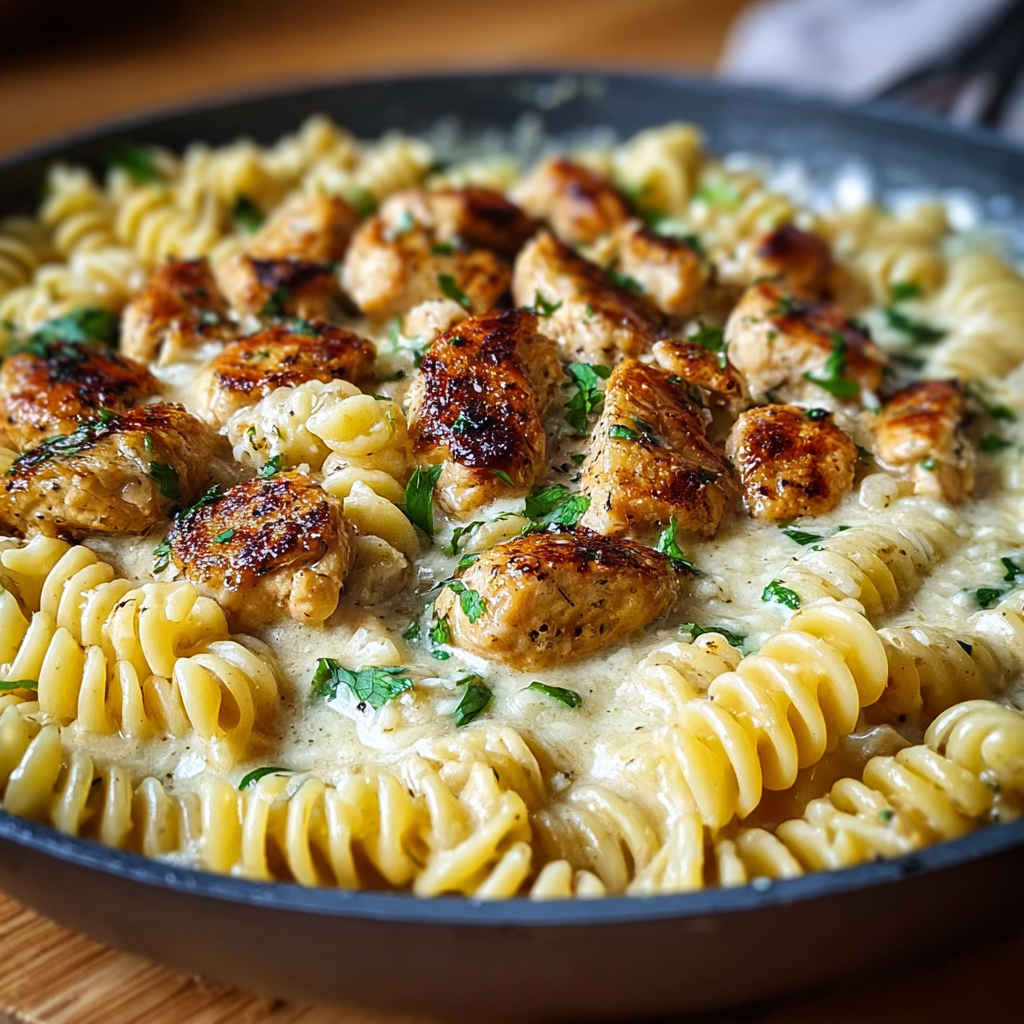
Creamy Garlic Butter Chicken & Rotini in Parmesan Sauce
Golden-browned chicken tossed with rotini in a silky garlic Parmesan sauce—comforting, quick, and perfect for weeknight dinners.
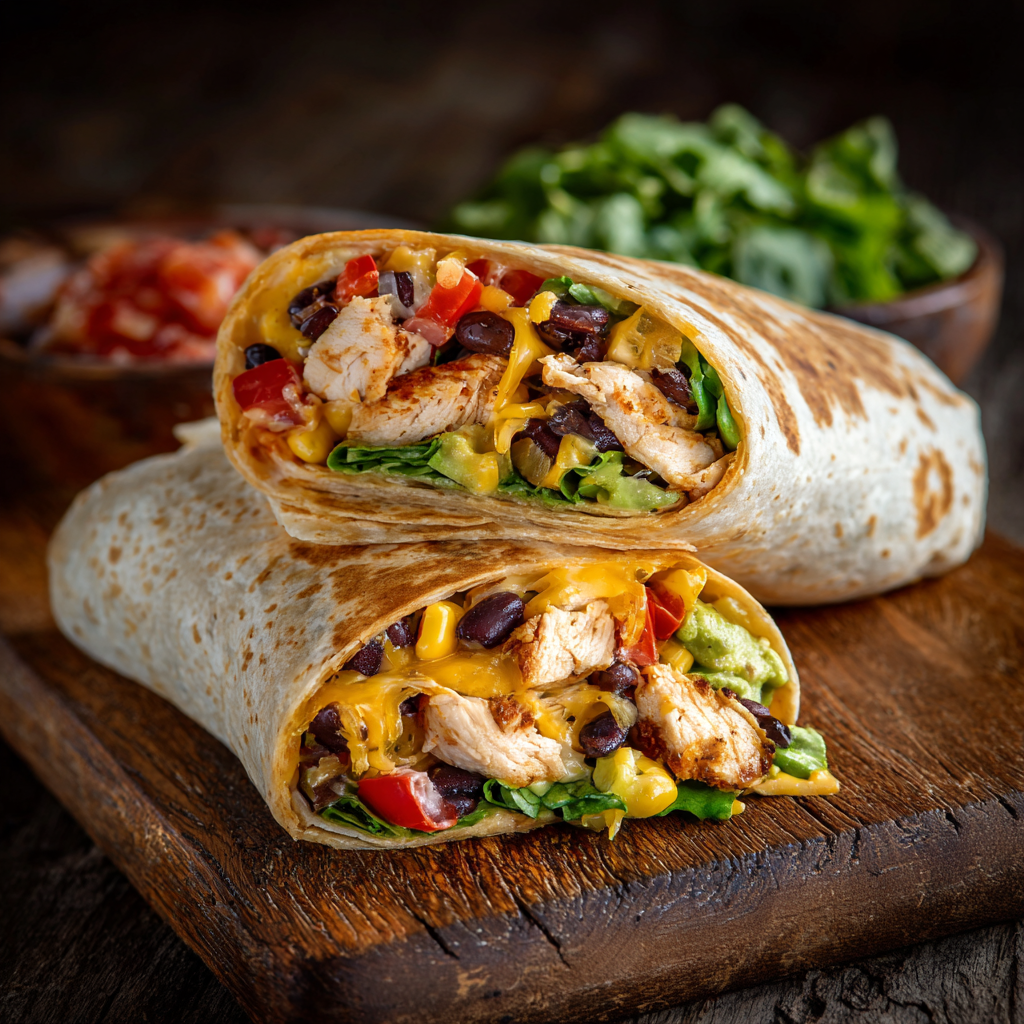
Southwest Chicken Wrap
A vibrant, smoky Southwest chicken wrap loaded with rice, beans, corn, and a creamy chipotle-lime sauce — perfect for lunch, meal prep, or an easy weeknight.

Classic Apple Crumble
A timeless apple crumble with a buttery, cinnamon-scented topping and tart-sweet Granny Smith filling — perfect warm with vanilla ice cream.
Did You Make This?
Leave a comment & rating below or tag @snapyrecipe on social media!
Rate This Recipe
Share This Recipe
Enjoyed this recipe? Share it with friends and family, and don't forget to leave a review!
Comments (1)
This recipe looks amazing! Can't wait to try it.
Comments are stored locally in your browser. Server comments are displayed alongside your local comments.
Hi, I'm Natalia!
What's Popular
Get My 30-Minute Meals email series!
Quick and easy dinner ideas delivered to your inbox.